Your payment will be sent to your email immediately after payment is completed, and you can also check it on your My Page. It will be sent within one hour on business days.

We support only Paypal. All payments are securely encrypted and processed.

You can enter your product key in Windows Settings > Update & Security > Activation > Change Product Key. For more information, please refer to the guide page.

No, a genuine license key can only be used on one PC at a time. To use it on another PC, you must deactivate it on the previous PC.

It’s available for free download from the official Microsoft website (https://www.microsoft.com/ko-kr/software-download). We only sell genuine license keys and do not provide installation files.

Yes, you can. After purchasing a Pro license key, enter it in the Change Product Key menu to upgrade.

Due to the nature of license keys, refunds are not possible after they are shipped. However, if the key does not function properly, we will exchange or refund it.

Due to the nature of license keys, we cannot exchange them after they’ve been shipped. There’s no way to retrieve the issued key. Please check the required license before placing your order!

1) Verify that you entered the correct key. 2) Check your Internet connection. 3) Verify that your Windows version matches. If the problem persists, please contact Customer Service.

Yes, we do. We offer discounts for purchases of 100 or more. Please contact our customer service center for a quote.

How to Install Windows Server (Text Guide)

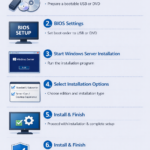
1. Prepare Installation Media

  • Download the Windows Server ISO from Microsoft.

  • Create a bootable USB (using tools like Rufus) or mount the ISO to a virtual machine.

  • Insert the USB or attach the ISO to the server.


2. Configure BIOS / UEFI

  • Power on the server and enter BIOS/UEFI (usually DEL, F2, or F12).

  • Set Boot Mode:

    • UEFI (recommended for modern servers)

    • Legacy if required by hardware

  • Set the boot order to USB or virtual CD/DVD first.

  • Save changes and reboot.


3. Start Windows Server Setup

  • The server boots from the installation media.

  • Select:

    • Language

    • Time and currency format

    • Keyboard layout

  • Click Install Now.


4. Select Windows Server Edition

  • Choose the correct edition:

    • Standard or Datacenter

  • Choose installation type:

    • Server Core (no GUI, command-line only)

    • Desktop Experience (GUI)

  • Click Next.


5. Accept License Terms

  • Read and accept the Microsoft license agreement.

  • Click Next.


6. Choose Installation Type

  • Select Custom: Install Windows only (advanced).


7. Configure Disk and Partitions

  • Select the target disk.

  • Create, delete, or format partitions as needed.

  • Click Next to begin installation.


8. Installation Process

  • Windows Server files are copied and installed.

  • The server will reboot automatically several times.

  • Do not remove installation media until setup completes.


9. Set Administrator Password

  • After installation, you will be prompted to set the Administrator password.

  • Use a strong password and confirm.


10. First Login and Initial Configuration

  • Log in as Administrator.

  • Configure:

    • Network settings (IP, DNS)

    • Windows Updates

    • Time zone

    • Firewall and security settings

  • Use Server Manager to add roles and features (AD, DNS, IIS, etc.).


Tip (Recommended After Installation)

  • Install the latest Windows Updates

  • Install device drivers from the server vendor

  • Activate Windows using a valid license key

  • Configure backups and security policies


If you want, I can also provide:


  • Server Core installation steps

  • Windows Server installation on VMware / Hyper-V

  • Post-installation hardening checklist

  • A printable PDF version

How to Install Microsoft SQL Server on a Server

1. Check System Requirements

  • Windows Server 2016 / 2019 / 2022

  • 64-bit CPU

  • Minimum 4 GB RAM (8–16 GB recommended)

  • At least 6 GB free disk space

  • Local Administrator privileges

  • Internet connection (for updates)


2. Download SQL Server Installer

  • Download SQL Server ISO or setup from Microsoft

  • Copy the installer to the server

  • Mount the ISO or extract setup files


3. Start SQL Server Setup

  • Run setup.exe

  • In SQL Server Installation Center, select:
    Installation → New stand-alone installation


4. Setup Support Rules

  • The installer checks system prerequisites

  • Resolve any warnings or errors

  • Click Next


5. Choose Installation Type

  • Select Perform a new installation

  • Click Next


6. Enter Product Key

  • Choose one:

    • Enterprise / Standard (enter product key)

    • Developer (free, full features)

    • Evaluation (180-day trial)

  • Click Next


7. Accept License Terms

  • Accept the license agreement

  • Click Next


8. Feature Selection

Select required components:

  • ✅ Database Engine Services (required)

  • ⬜ SQL Server Replication (optional)

  • ⬜ Full-Text Search (optional)

  • ⬜ Analysis Services (optional)

  • ⬜ Integration Services (optional)

Choose installation paths if needed
Click Next


9. Instance Configuration

Choose one:

  • Default Instance (MSSQLSERVER)

  • Named Instance (e.g., SQL2022)

Click Next


10. Server Configuration

  • Set service accounts (recommended: separate accounts)

  • Startup type:

    • SQL Server Database Engine → Automatic

  • Collation:

    • Default is usually fine

    • Change if required by application

Click Next


11. Database Engine Configuration

Authentication Mode

Choose one:

  • Windows Authentication (recommended)

  • Mixed Mode (Windows + SQL login)

    • Set strong sa password

Add SQL Administrators

  • Add current administrator account

  • Add DBA or service accounts if required

Click Next


12. Install SQL Server

  • Review summary

  • Click Install

  • Installation may take several minutes


13. Complete Installation

  • Verify installation success

  • Click Close


14. Post-Installation Steps (Recommended)

1️⃣ Install SQL Server Management Studio (SSMS)

  • Download SSMS separately from Microsoft

  • Install SSMS to manage SQL Server


2️⃣ Apply Updates

  • Install latest SQL Server CU (Cumulative Update)

  • Restart if required


3️⃣ Configure Firewall

  • Open TCP port 1433 (or custom port)

  • Allow SQL Server service in Windows Firewall


4️⃣ Configure SQL Server Settings

  • Set memory limits

  • Configure backup paths

  • Configure maintenance plans

  • Enable TCP/IP in SQL Server Configuration Manager


15. Verify Installation

  • Open SSMS

  • Connect to:

    • localhost

    • or ServerName\InstanceName

  • Run:

 
SELECT @@VERSION;

Summary

  • SQL Server installs via setup.exe

  • Choose correct edition and features

  • Configure authentication and admin access

  • Install SSMS separately

  • Apply updates and secure the server

How to Install Microsoft Office 2021 Professional Plus

A. Installing on Windows PC

1. Check System Requirements

  • Windows 10 or Windows 11

  • Internet connection

  • At least 4 GB RAM (8 GB recommended)

  • 4 GB free disk space

Note: Office 2021 Pro Plus is officially supported only on Windows. There is no Pro Plus edition for macOS.


2. Remove Previous Office Versions (Recommended)

  • Open Control Panel → Programs → Programs and Features

  • Uninstall any existing Microsoft Office versions

  • Restart your PC


3. Download Office 2021 Pro Plus

  • Sign in to your Microsoft account or

  • Use the Office Deployment Tool (ODT) for volume license installations

  • Download the Office installation files to your PC


4. Install Office 2021 Pro Plus

Option 1: Standard Setup

  • Run setup.exe

  • The installer downloads and installs Office automatically

Option 2: Office Deployment Tool (Advanced)

  • Create a configuration XML file

  • Run the command:

 
setup.exe /configure configuration.xml

5. Complete Installation

  • Wait for the installation to finish

  • Restart your PC if prompted


6. Activate Office 2021 Pro Plus

  • Open any Office app (Word, Excel, etc.)

  • Enter your product key or sign in with a licensed Microsoft account

  • Activation completes online


7. Verify Installation

  • Open Word → Account

  • Confirm version shows Office 2021 Professional Plus


B. Installing Microsoft Office on macOS

⚠️ Important: Office 2021 Professional Plus is NOT available for macOS.

Available macOS Alternatives

  • Microsoft Office 2021 for Mac (Home & Business)

  • Microsoft 365 for Mac


Steps to Install Office on Mac (Supported Versions)

1. Check macOS Requirements

  • macOS 11 (Big Sur) or later

  • Apple Silicon or Intel CPU

  • 4 GB RAM minimum


2. Download Office for Mac


3. Install Office

  • Open the downloaded .pkg file

  • Follow the on-screen installation steps

  • Enter macOS administrator password if requested


4. Activate Office on Mac

  • Launch Word or Excel

  • Sign in with your Microsoft account or enter a product key


5. Verify Installation

  • Open Word → About Word

  • Confirm version and license status


Summary Table

PlatformSupported Version
WindowsOffice 2021 Professional Plus ✅
macOSOffice 2021 Home & Business / Microsoft 365
macOSOffice 2021 Pro Plus ❌ Not Supported

1. Check Device Requirements

Before installation, confirm your device supports Windows 11 IoT Enterprise.

Minimum requirements

  • 64-bit CPU (x64 or ARM64)

  • 4 GB RAM (8 GB recommended)

  • 64 GB storage

  • UEFI firmware with Secure Boot support

  • TPM 2.0 (recommended, may be optional for some IoT devices)

  • Administrator access to the device

Note: Windows 11 IoT Enterprise is intended for commercial and embedded devices, not general consumer PCs.


2. Obtain Windows 11 IoT Enterprise Media

  • Get the Windows 11 IoT Enterprise ISO from:

    • Microsoft Volume Licensing Service Center (VLSC), or

    • Authorized Microsoft IoT OEM / distributor

  • Verify the correct edition:

    • Windows 11 IoT Enterprise

    • Windows 11 IoT Enterprise LTSC (if required)


3. Create Installation Media

Option A: Bootable USB (Most Common)

  • Insert a USB drive (8 GB or larger)

  • Use tools such as:

    • Rufus

    • Windows Media Creation alternatives (OEM tools)

  • Write the ISO to the USB as a bootable drive

Option B: Network or OEM Recovery Media

  • Use PXE boot or manufacturer-provided recovery tools if supported


4. Configure BIOS / UEFI Settings

  • Power on the device

  • Enter BIOS/UEFI (F2, DEL, ESC, or vendor-specific key)

  • Set:

    • Boot Mode: UEFI

    • Secure Boot: Enabled (or disabled if OEM requires)

    • Boot Order: USB first

  • Save settings and reboot


5. Start Windows 11 IoT Enterprise Setup

  • Boot from the installation USB

  • Select:

    • Language

    • Time and region

    • Keyboard layout

  • Click Install Now


6. Enter Product Key

  • Enter your Windows 11 IoT Enterprise product key
    or

  • Select I don’t have a product key (if activation is done later via volume license)


7. Select Edition

  • Choose:

    • Windows 11 IoT Enterprise

    • or Windows 11 IoT Enterprise LTSC

  • Click Next


8. Accept License Terms

  • Accept the Microsoft Software License Terms

  • Click Next


9. Choose Installation Type

  • Select Custom: Install Windows only (advanced)


10. Disk and Partition Setup

  • Select the target disk

  • Create or delete partitions as needed

  • Select the primary partition

  • Click Next to start installation


11. Installation Process

  • Windows copies files and installs features

  • Device restarts automatically several times

  • Remove installation media when prompted


12. Initial Device Configuration

  • Set:

    • Region and keyboard

    • Network connection

  • Create or configure:

    • Local administrator account

    • Password and security settings

IoT Enterprise does not require a Microsoft consumer account.


13. Install Device Drivers

  • Install hardware-specific drivers:

    • Chipset

    • Graphics

    • Network

  • Use OEM-provided drivers for best compatibility


14. Activate Windows

  • Activate using:

    • Volume license key (KMS/MAK)

    • OEM activation (OA3)

  • Verify activation:

 
slmgr /xpr

15. Post-Installation Configuration (Recommended)

  • Install latest Windows Updates (if allowed)

  • Configure:

    • Assigned Access / Kiosk Mode

    • Group Policy

    • Device lockdown features

    • Firewall and security policies

  • Remove unnecessary consumer features if present


16. Verify Installation

  • Open Settings → System → About

  • Confirm:

    • Edition: Windows 11 IoT Enterprise

    • Activation status: Activated


Summary

  • Windows 11 IoT Enterprise installs similarly to Windows 11

  • Requires OEM or volume licensing

  • Optimized for fixed-purpose and embedded devices

  •